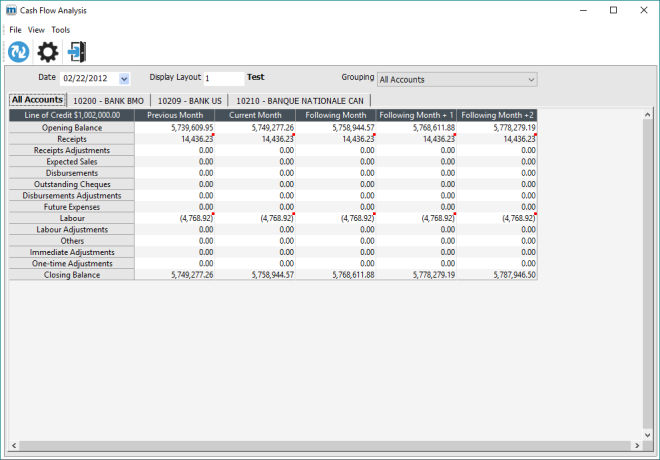
Cash Flow Analysis
Objective
The Cash Flow Analysis option enables users to monitor receipts, disbursements, and available funds as needed, based on previously set parameters; the resulting amounts are displayed in tables. Functions include a drill-down to more detailed information, such as the related transactions list.
Other items like a refresh schedule for the analysis table can be configured.
This option can also be accessed through an applet on the maestro* dashboard.
For instructions on configuring and using the applet, refer to the Cash Flow Analysis How To document. |
prerequisites
- General Settings (General Ledger > General > Cash Flow Analysis)
- Chart of Accounts
- Bank Accounts
- Annual Budgets
- Payroll / Labour
- Line Configuration
- Display Layout Configuration
- Define Manual Adjustment Types
Icons
Icon | Title | Used to |
|---|---|---|
 | Refresh | Refresh the analysis information based on the given parameters. |
 | Configuration | Access the Options window where users can indicate settings such as how often the analysis data should be refreshed and whether bank accounts appearing in the tables should be grouped. Click here for a description of the Options window. |
STEPS
| maestro* > Accounting > Financial Management > Cash Flow Analysis > Cash Flow Analysis |
Analyzing the Cash Flow
- Enter the
 information in the fields as needed.
- Click the Refresh button to access the cash flow analysis layout.
The analysis is presented in accordance with the lines and columns parameters previously set in maestro*, in the Line Configuration and Display Layout Configuration options.
For additional information on the lines’ rules and calculation methods, as well as the periods defined by the columns, go to the corresponding Help (F1) documents.
The analysis is displayed on tabs:
- the first tab, All Accounts, summarizes the amounts of all the accounts included in the group;
- every other tab provides data specific to an account.
On each tab, in the top left corner of the layout, the Line of Credit field indicates the available amount. The Line of Credit amount can be entered in the Bank Accounts option.
- In the table, double-click on a cell to obtain detailed information on a specific amount.
It is possible to drill down on every cell in the analysis, except for the opening and closing balances. Drilling will display the transaction list related to the amount.
A red square in the top right corner of a cell indicates that transactions have been posted. Previous periods only contain posted transactions.
- Repeat steps 1 and 2 to view different account groupings.
- Click Quit to exit the window.
See also
Procedures
How To
Appendix
Options window
The Options window is used to define settings specific to the Cash Flow Analysis window, such as Automatic Refresh, Bank Descriptions, etc.
- Enter the
 required information as needed.
- Click Ok to exit the Options window and return to the Cash Flow Analysis window.
